Here it is, the second online tutorial for creating your Sim Lab Video Orientation, or ANY video production you are planning for your Sim Lab (like a promotional or training video). This video covers all the tips and tricks of production I learned from my years of experience working in Hollywood! I have also created a Production Guide that summarizes all of the tips discussed in the above video, plus answers all of the SPECIFIC questions that I received after posting the first video.
Click here to download the Healthy Simulation Production Guide
Although I will post the content of the guide in the remainder of this post, feel free to download this guide now for later use as it covers all the basics for Sim Lab Video Productions! The Production Guide also includes the Sim Lab Video Orientation Outline, which helps to remind you about all the different areas of a Sim Lab that you should individually shoot to maximize your efforts!
I want to thank everyone for sharing questions and comments last week – you really helped me make this the best guide it could be! Enjoy and don’t forget to share this post with your friends!
Didn’t see Part 1? Click here to see the first part of the Video Orientation Tutorial, which explains the benefits of using video and where to look to get your video made for FREE!
Sim Lab Video Orientation Tutorial Production Tips Summary
Below are two GREAT examples of successful Sim Lab Video Orientations:
Los Angeles Harbor College Nursing Program Simulation Lab Orientation
Clinical Simulation Center of Las Vegas Emergency Department Sim Lab Orientation
First, consider how you are going to show your video to learners. This is an important consideration because the published format will affect the way you record your content. Near the end of this document under “Publishing” I will describe in detail the different ways you can publish your video after completing the editing phase. “Publishing” refers to the way the video is saved and distributed to your learners.
Detail is crucial – The more you include in your orientation video, the less you will have to repeat in person later on. Consider all the questions you have ever received in a live simulation orientation and then plan to include appropriate explanations in your video. Explain the simulation process from start to finish. Inform students that they must leave any notes they have taken behind in the simulation room at the end of the scenario and NOT to discuss what happened until everyone is back in the debriefing room.
Length – Ten minutes is an ideal length for a video orientation of a sim lab and manikin.
Shoot “Behind the Mirror” – If you have a two way mirror, try to capture the staff and systems behind the two-way mirror so that learners understand the process of simulation from the staff’s perspective – which is one of serious work!
Production Tips
Use a tripod – The steadier your shots are, the more learners will be able to focus their attention on what is being conveyed on screen. Shaky shots are hard to follow.
If you can, use wheels on a tripod for smooth motion.
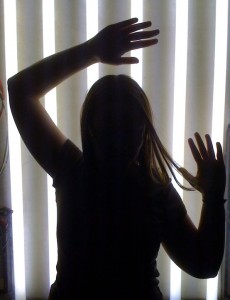
Avoid Backlighting – Backlighting occurs when the background is brighter than the foreground. When there is a bright window behind your subject, they may turn into an invisible silhouette and facial expressions will be lost. If you have bright windows near your production space, turn the camera away from them, close the shades or even put up a blanket. That way whatever light you have will be coming from inside the room.
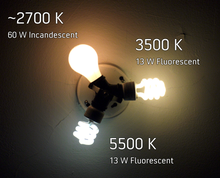
Avoid light blending when possible – If you do have outside daylight coming into the recording room, or if you have rented some production lights but have fluorescent bulbs in the ceiling – you will be mixing different types of lighting temperatures. Different temperatures of light give off different wavelengths – and thus different colors. Sunlight is very bright and tends to produce a blue light while indoor lighting is less intense and more orange. (Fluorescents are green and even pinkish, and should be avoided if possible). If you do have conflicting color issues, learn how to use your “WHITE BALANCE” button on your camera – this will let you manually control which color of lighting you want the camera to focus on.
Shoot each shot for at least 10 seconds – This is important for two reasons. First, most media programs are edited so that each shot stays on the screen for 7 seconds. For example, a clip of a man walking to his car would be on screen for 7 seconds and then the camera “cuts” to the next shot of him driving down the road for about another 7 seconds. If a shot is less than 7 seconds, typically some intense action is taking place. If a shot is more than 7 seconds, most likely something emotional, dramatic or breathtaking is occurring. So 7 seconds is the right time for learners to visually recognize what is happening, learn what is necessary, and still keep pace without boring them. The second reason has to do with transitions.
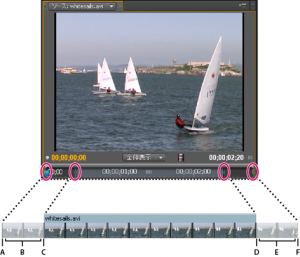
Transitions – the transition is the area in a completed video where you have spliced two clips together. For example, if you were to fade from a white screen to a black screen, the momentary shift where grey was present would be your transition. When you plan to fade between two shots you will need to add additional footage on either end of the clip for transitioning. This allows for the fade effect and prevents loss of important footage. Transitions between shots are really useful for maintaining audience’s attention. Quick cuts without a transition effect force the eyes to reprocess what is happening on the screen while transitions that softly move viewers from one shot to another are easier to follow. If there are no “tails” on either side of your shot, (usually about 1-2 seconds– there won’t be any extra time for transitions – and you will be forced to make a hard cut from shot to shot.
How to Record properly – Lastly, when you press record realize that the camera does not always immediately start recording. Wait for the red light to come on fully. Then wait 2 ADDITIONAL seconds before starting your scene. Meaning:
Hit the Record Button.
Red record light comes on.
Wait 2 seconds.
Signal (not say) your action to begin.
Presenter starts speaking or the camera starts moving to capture the shot.
This will give you the transition times necessary for editing AND make sure you capture your action adequately.
Start wide then get close – typically in movies a scene is established by showing a far exterior shot first and then gradually zooming in to show detail. For example, imagine a bank scene. The first shot shows the inside of the bank. The camera next moves inside through the hustle of the busy bank tellers and then zooms into the manager’s desk, The final shot would show the manager hand writing a check out to Lance Baily for $1,000,000. So we take a large perspective, cut it up and zoom into the important details.
Zooming – Speaking of zooming, keep the camera at a set distance during the recording of a person speaking. Zooming in or out during a conversation may create difficulties when you start editing. For example, you may find a certain area of recording is redundant and you decide to eliminate this section. If you cut out the unwanted section but you have changed the zoom while filming, your scene will jump perspective. This will result in the subject suddenly becoming either much closer to or farther away from the camera. Use wide shots to gain slow wide perspectives, and use close zoomed-in shots to show details of important functionality or procedures but try to maintain the zoom for each section.
Outlining – While shooting your sim lab, start with a wide rotating shot of the space and then break down each important section of the room – piece by piece. For example:
- Wide of the Entire Sim Lab on one shot, then:
- Nurses Desk
- Calculator
- Patient Chart
- Phone System
- Nurses Desk
- Manikin
- Head
- Eyes
- Pupil Dilation
- Nose
- NG Tube insertion
- Mouth
- Intubation procedures
- Cyanosis
- Eyes
- Upper Torso
- ……
- ……
- Head
- Crash Cart
- ……
And so on! I have broken down the suggested outline for a Sim Lab Video Orientation at the end of this handout. Remember to go through each and every drawer, feature, or system that may be present in your sim lab. The more time you spend showing the detail of the sim lab in your video, the easier it will be for your learners to become oriented and the less time it will take for the staff to orient students.
What learners CAN’T do in your sim lab – What learners CANNOT do is just as important as what they can do when in the Sim Lab. For example most manikins cannot actually “consume liquids”, and are “allergic to ink”. Go through all the things you have found your learners attempting to do that either they cannot or you don’t want them to do.
Multiple Simulation Setups – If you do have multiple manikins from different companies, definitely make sure to do a “head to toe” assessment on each product type. You can always mix and match manikins with cdifferent rooms later on in the editing room. For example if I have 3 different manikins which can be used in 2 different sim labs, I first shoot both rooms separately and then film a separtation orientation for each of the three manikins . And then whereever I show the orientation videos e.g. in the editing room OR the debriefing room, I can simply drag and drop the tutorial I want to show. Once everything is shot and edited individually, you can easily create an orientation for Room A with Manikin 3 or Room B with Manikin 1 etc, with very little additional time.
Audio Tips
Getting clean audio is crucial for a high quality production. Remember the picture is only HALF the presentation! So spend a few moments each time you place your camera to consider your audio capturing.
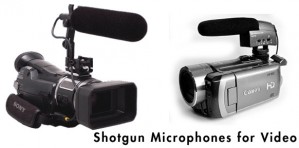
If you can, get a BOOM microphone (aka shotgun mic) on your camera – Boom microphones are the foam covered devices above both of these cameras:
A boom microphone is farther from your camera body and won’t pick up noises from handling the camera like an “on-board microphone”. In addition, boom mics only record what they are pointed at, and so a lot of superfluous room noise will not also be captured. This provides a much higher quality audio than a regular “on-board” microphone which captures everything going on around the entire camera.
Silence is Golden. Is the room quiet? If not, can it be made quiet? When you say “action”, use the silly silent countdown of “3… 2… 1” so that your actor knows when to start but you won’t have to worry about hearing you say “Action” later on in the editing room. Make sure cell phones are off (not just muted) because they may interfere with the recording. If necessary, post “Quiet Please” notices in the corridors outside the room you are recording. Extraneous sounds detract from the video quality.
Are you picking up your subject? Most cameras have a way to check the audio levels of your subject. You should be capturing digital audio at around 12 dbs (see image below), so check to make sure when your actor speaks the lines are hitting that range. If they are not, move the camera closer or have your actor speak up.
Voice Over Recording – One great way to do audio quickly is to shoot a “Voice Over” sequence. I do this most of the time! I shoot 5 or so shots of an important scene, for example, the features of the manikin chest area. Then I sit in front of the camera with a script and shoot myself talking about what the audience needs to know about those shots. Finally, in the editing room, I take the 5 shots, drop them next to one another, remove any unwanted audio recorded from the clip and drop in JUST the audio from my “Voice Over”. This way, the resulting video contains the shots and voice over. Once you learn how to do this properly, creating orientation videos will become much easier!
Editing
Editing – takes the most time in a production solely because learning editing software for the first time can be difficult. However, if you have some time and a computer with editing software (like the Macintosh imovie), editing can be really fun! Here are some links to beginning tutorials for the major editing software products on the market (which are also linked at the end of Part 2).
Publishing
Burning/Exporting Your Video – After editing your video, there are three different ways you can save your video to show your learners. Again, knowing how to export your completed video project is something that is unique to the editing software you use. So while I can explain the general concepts about publishing here, you will need to spend some time (or pay someone else) to learn your video editing system. Start with the beginner’s editing guides I link to on the HealthySimulation.com post and take it from there!
1) Computer: You can export your video file in HD (High Definition) or compressed HD (H.264 codec) as a QuickTime movie file (for Apple) or avi file (for PC). These video files are playable on almost any computer. I would suggest you compress the video file but keep it in an HD format if going this route. A straight HD export “File -> Export” will be a HUGE file that may take an external hard drive to copy from computer to computer. A compressed video file could fit on a thumb drive. For an example of how to export a compressed sequence in Quicktime check out: http://www.youtube.com/watch?v=wSlsgrRX8gw
2) Youtube: I highly suggest uploading your orientation video to youtube. Then learners will be able to watch the orientation video anytime so long as they have internet access (even in HD) including from debriefing rooms, classrooms, their homes or even their phones! Youtube provides quality and accessibility together. You will need to create a youtube account. Just follow the website’s directions for selecting your video file for uploading, titling, and other options you want to make your video. I usually turn off comments on my orientation films because most of the time spammers will post garbage. With youtube there are 3 main requirements:
- The video must be 10 minutes or less.
- The video must be less than 2 gigabytes. (Use Compressed export to get this for HD as explained above).
- The video must NOT contain copyrighted music. (Actually some music is ok, check their library to see if the song you want to add to your video is released for use).
3) Television: If you want to play your orientation on a standard television, either through a VHS or a DVD player, you will need to keep the aspect ratio at 720×480 – which means the quality is capped at a mini-DV format. This means no HD. I recommend shooting and publishing your video in an HD format if possible, as the quality is much much better. But if you only have a mini-DV camera, don’t let this stop you from producing your video. Your video will still be much better quality video than no video at all!
Click here to download the The Sim Lab Video Orientation Production Outline separately.
One final tip, if you are recording someone going through a long speech, for example a thirty minute physical exam, don’t be afraid to stop every five minutes. Capturing 5 solid minutes at a time with a planned out script will provide MUCH higher quality than recording for 30 minutes straight without stopping the tape. People don’t usually explain clearly after about 5 minutes of dialogue, and if they mess up they will want to start the sentence over. Say they do this 10 times. This will result in10 places that you have to find and fix in the editing room later on! Shoot in segments and you will have an easier production in the long run!
I hope this How-To Guide has been helpful for your Healthcare Simulation Lab Video Orientations! Know that you can use all the techniques explained here in OTHER videos your Sim Lab may want to produce: Promotional pieces, interviews with faculty, training films, etc. etc. etc.
It may seem like video production is complicated, but with just a bit of planning and rehearsal, your production will come out wonderfully. You’ll see how much fun it is to make movies!

